 Save
Save I first made these little graduation cap snacks for my cousin's college graduation party, and I have to admit, I was skeptical about turning food into tiny academic regalia. But the moment I saw her face light up when she realized what they were—before even tasting one—I knew this quirky idea was pure magic. There's something about edible decorations that makes people smile in a way regular appetizers just can't match. Now whenever I need a conversation starter at a party, these little caps are my secret weapon.
The first time I made these, my best friend was helping me prep for a surprise graduation brunch, and we were laughing so hard trying to get the licorice tassels to drape just right that we nearly dropped the whole batch. That's when I realized these aren't just snacks—they're little edible jokes that bring people together. Everyone at the party wanted to know how I made them, which made me feel like the smartest person in the room for five minutes.
Ingredients
- Square crackers: Pick ones sturdy enough to hold the cheese without bending, but still have that satisfying crunch. Water crackers or Wheat Thins work beautifully because they're substantial enough to be a real base, not just theatrical props.
- Square cheese slices: Cheddar has that classic, slightly salty profile that balances the sweetness of the licorice perfectly, but Swiss gives you those charming little holes if you want extra visual interest. American cheese works too if that's what you love.
- Black licorice strings or dried fruit strips: The licorice creates that authentic tassel drape and adds a playful sweet-salty moment. If you're not a licorice fan, dried mango or apricot strips are genuinely elegant alternatives that feel more gourmet without changing the spirit of the snack.
- Cream cheese or hummus: This is your glue, and it needs to be thick enough to hold things in place but spreadable enough not to require a construction crew. I prefer cream cheese because it's neutral and lets the other flavors shine, but hummus adds a little earthy sophistication if you're serving a more savory crowd.
- Candy pearls or raisins: These are optional, but that tiny button at the end of the tassel is what makes people go "oh, that's clever." Raisins work perfectly if you're going for a more natural aesthetic.
Tired of Takeout? 🥡
Get 10 meals you can make faster than delivery arrives. Seriously.
One email. No spam. Unsubscribe anytime.
Instructions
- Build your foundation:
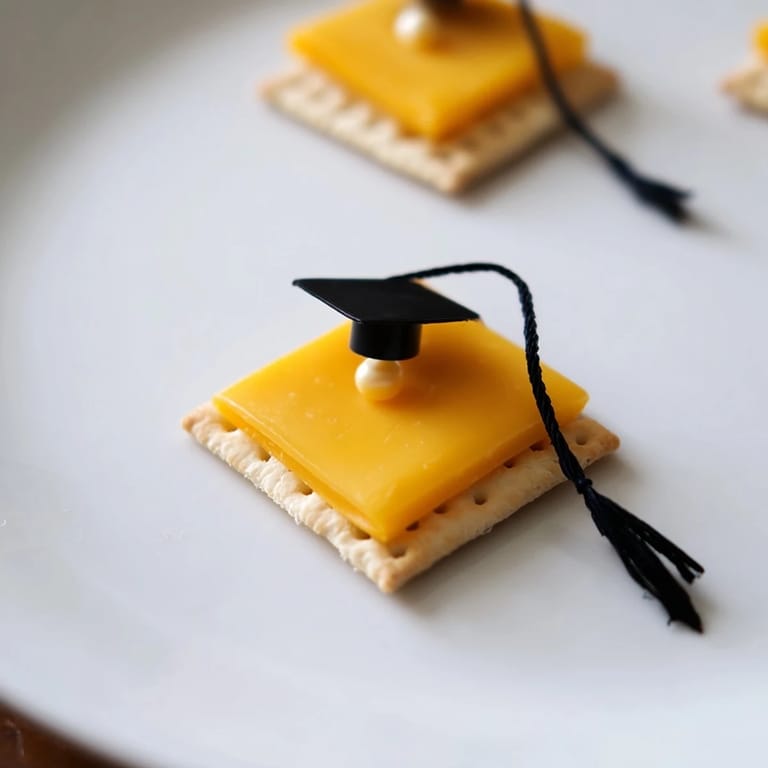
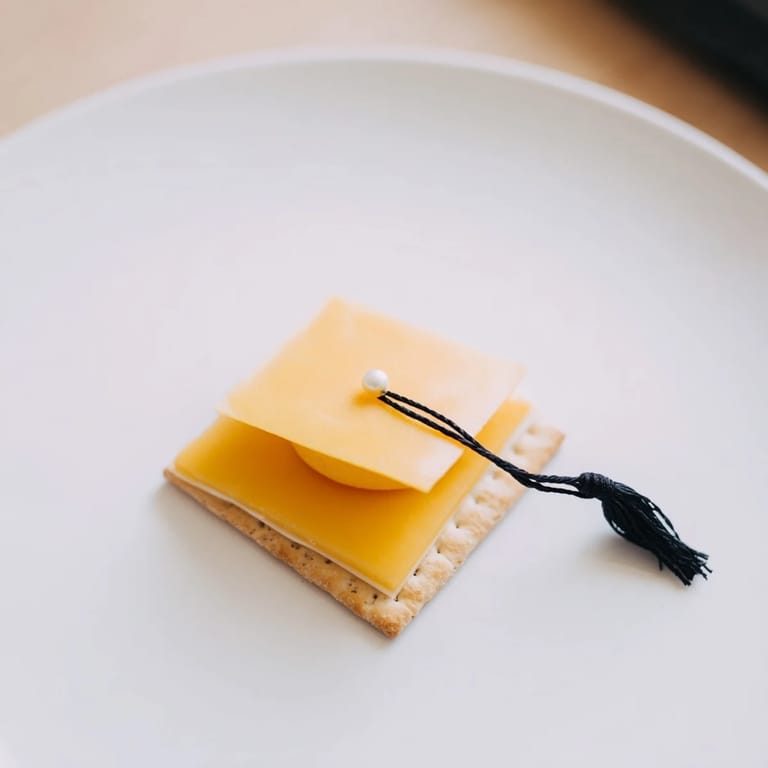
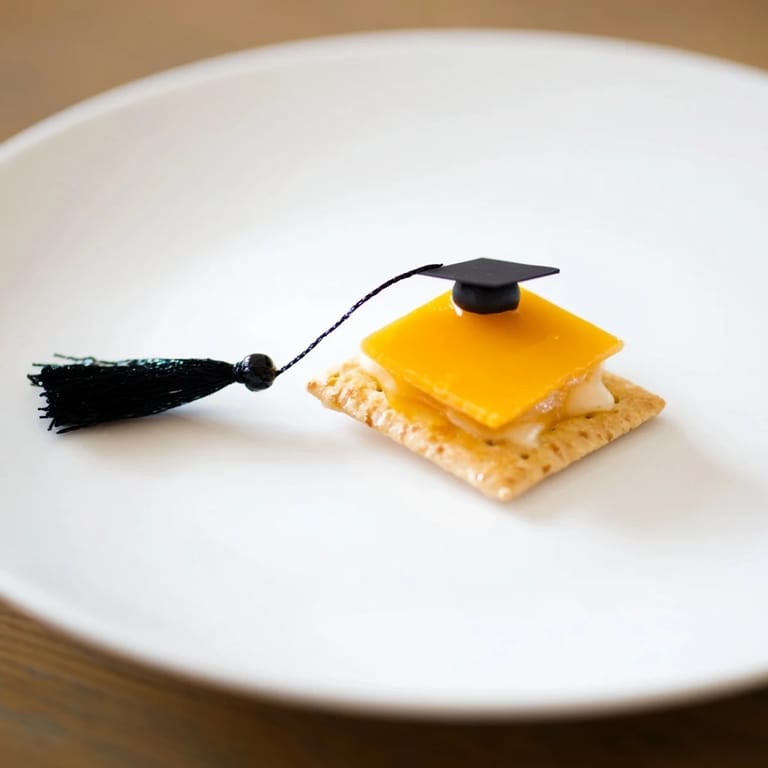
- Grab a square cracker and set it gently on your serving platter. This is your academic base, and it should feel solid beneath your fingertips. Don't rush this part—you're about to create something that needs to stand proudly.
- Crown it with cheese:
- Take a slice of cheese and lay it square and even on top of that cracker, aligning all four corners so it looks intentional and dignified, like a proper mortarboard. The cheese should sit flat and confident on its cracker base.
- Add the tassel with personality:
- This is where the magic happens. Take one end of your licorice string or fruit strip and attach it to one corner of the cheese square using just a tiny dab of cream cheese or hummus as your adhesive. Position it so the tassel drapes naturally over the edge, like it's caught mid-swing. You want it to look like it's been tossed carelessly by someone in celebration, even though you're being very intentional about its placement.
- Crown the tassel:
- If you're using candy pearls or raisins, secure one right at the end of your tassel with a small dab of adhesive. This tiny detail transforms it from a simple string into an actual graduation cap tassel, and honestly, it's worth the extra second of effort for the impression it makes.
- Repeat and serve:
- Keep building until you've assembled all twelve little caps, each one a tiny monument to celebration. Arrange them on your platter so they catch the light, then serve immediately while the crackers are still crisp and everything feels fresh and full of promise.
 Save
Save What I love most about these snacks is watching people's faces transform when they understand what they're looking at. At a graduation party last spring, I watched a grandmother pick one up, study it carefully, then break into the biggest smile when the little cheese and cracker layers revealed themselves. She told me later that this was the first time she'd felt young enough to enjoy the celebration alongside the graduates. That's when I knew these silly little snacks had become something meaningful.
Variations to Celebrate Different Moments
Once you understand the basic structure, these little caps become a canvas for different celebrations and dietary needs. I've made them with everything from sharp aged cheddar for sophistication to mild American cheese for kids' parties. The beauty is that you can theme them around whoever you're celebrating—gluten-free crackers for friends with dietary restrictions, different colored licorice or fruit strips to match school colors, even savory hummus instead of cream cheese if you're feeding a crowd that doesn't love sweet-salty combinations. Each variation still tells the same story of achievement, just in a different flavor language.
Customizing Your Tassel
The tassel is where you get to inject personality into these caps. Black licorice is classic and creates that iconic graduation cap silhouette, but I've discovered that dried fruit strips offer their own kind of elegance. Red licorice looks festive for other celebrations, thin strips of dried mango add tropical sophistication, and even thin fruit leather can be cut into custom colors to match party themes. The important thing is that whatever you choose should be long enough to drape gracefully but not so long that it gets tangled or sad-looking on the platter.
Storage and Make-Ahead Strategy
The secret to serving these snacks confidently is understanding their timeline. You can prep all your individual components hours in advance—cut your cheese, arrange your crackers, cut your licorice or fruit strips—and keep everything in separate containers until assembly time. The actual assembly takes only minutes, which means you can finish them right before guests arrive when everything is still crisp and the cheese hasn't had time to soften into the cracker. If you're really pressed for time, you can assemble them up to 45 minutes ahead, but beyond that, you're fighting against inevitable softening. The key is remembering that these snacks are about the textural contrast, so protecting that crispness is worth the timing consideration.
- Keep assembled snacks on a cool platter, away from warm spots or direct sunlight
- If making ahead, store components separately in airtight containers in the refrigerator
- Assemble in the final 30 to 45 minutes before your celebration begins for maximum crunch and impact
 Save
Save These graduation cap snacks have become my favorite way to celebrate achievements because they prove that the most memorable food isn't always the most complicated. Sometimes the magic is in the thoughtfulness, the playfulness, and the way something edible can spark joy before it even touches someone's lips.
Recipe Questions & Answers
- → What crackers work best for this snack?
Choose square-shaped crackers like Wheat Thins or water crackers for the ideal base. Gluten-free options also work well.
- → Can I use other cheese types?
Yes, cheddar, Swiss, or American cheese slices about 1.5 inches square are perfect, but feel free to experiment.
- → What can be used to attach the tassel?
Small dots of cream cheese or hummus act as an adhesive to secure the licorice or dried fruit tassels onto the cheese squares.
- → Are there alternatives to licorice for the tassel?
Dried fruit strips such as mango or apricot cut into thin strips provide a colorful and tasty alternative.
- → How can I add detail to the tassel?
Place small candy pearls or raisins at the tassel end for a decorative button effect, securing them with cream cheese or hummus.