 Save
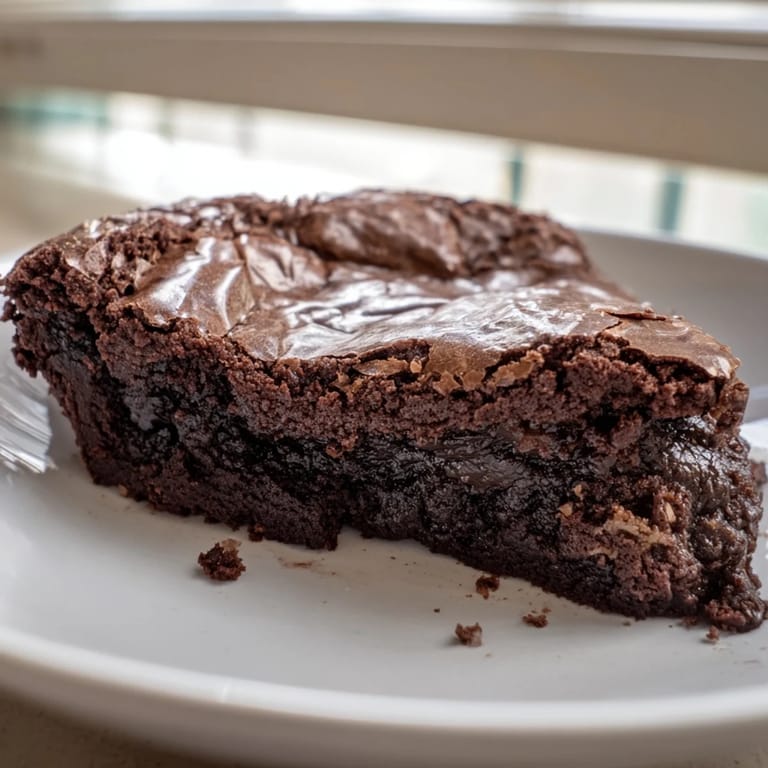
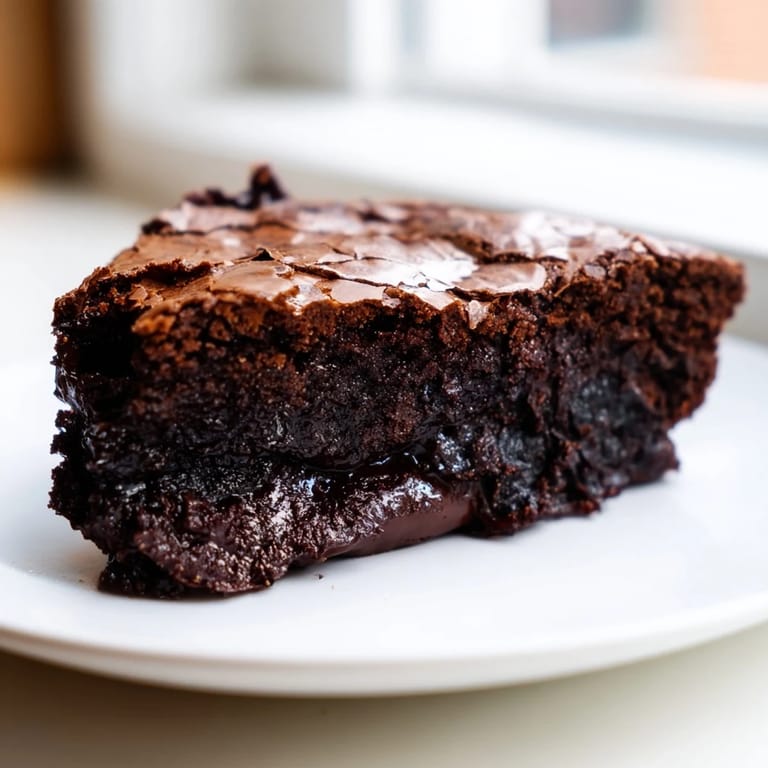
Save There's something almost magical about pulling a brownie pudding out of the oven and watching the crust crack just slightly as it settles. I discovered this recipe years ago when I was trying to create the ultimate chocolate dessert—something that felt elegant enough for guests but tasted like pure indulgence. The contrast between the crackly brownie top and the molten center completely won me over, and I've been making it ever since for anyone who needs convincing that chocolate desserts can actually be sophisticated.
I made this for a dinner party on a rainy February evening, and my friend Sarah took one bite and literally closed her eyes. She didn't say anything for a moment, just savored it, and when she opened her eyes she asked for the recipe before finishing her first bite. That's when I knew I'd found something special—a dessert that makes people slow down and actually pay attention to what they're eating.
Ingredients
- Unsalted butter (225g): Room temperature works best for melting smoothly with the chocolate, and using good quality butter makes a noticeable difference in the final richness.
- Semisweet chocolate (170g, chopped): Chopping it yourself rather than using chips helps it melt more evenly, and the size of the pieces doesn't really matter as long as they're roughly similar.
- Large eggs (4, at room temperature): Cold eggs won't incorporate as well when beating, so I pull mine out about thirty minutes before starting.
- Granulated sugar (2 cups/400g): This is what creates that beautiful ribbon when beaten with the eggs, which traps air and gives the pudding its light, almost souffle-like texture.
- All-purpose flour (1/2 cup/65g): Don't be tempted to add more flour thinking it will create a cake texture—this amount is intentional for keeping the center gooey.
- Unsweetened cocoa powder (2 tbsp): Sift this with the flour to break up any clumps and distribute it evenly throughout the batter.
- Vanilla extract (2 tsp): Pure vanilla extract makes a real difference in the flavor depth, so it's worth having good quality on hand.
- Kosher salt (1/4 tsp): This tiny amount enhances the chocolate flavor without making anything taste salty.
- Vanilla ice cream or whipped cream (for serving): Not optional in my book—the cold cream against the warm pudding is essential to the experience.
Tired of Takeout? 🥡
Get 10 meals you can make faster than delivery arrives. Seriously.
One email. No spam. Unsubscribe anytime.
Instructions
- Prepare your stage:
- Preheat the oven to 325°F and butter your 2-quart baking dish thoroughly—corners and all—so nothing sticks. Having everything ready means you can move through the steps without second-guessing yourself.
- Melt the chocolate mixture:
- Set a heatproof bowl over simmering water and melt the butter and chopped chocolate together, stirring often until completely smooth. The water should barely touch the bottom of the bowl, and once it's melted, let it cool just slightly so it doesn't cook the eggs later.
- Build the ribbon:
- In your stand mixer with the paddle attachment, beat the eggs and sugar on medium-high speed for 5 to 10 minutes until the mixture is thick, pale, and falls in ribbons when you lift the paddle. This step is where patience pays off—don't rush it.
- Combine gently:
- Reduce the mixer to low speed, add the vanilla and salt, then slowly pour in the cooled chocolate mixture, stirring just until combined. Overmixing at this point will deflate all that beautiful air you just trapped in the eggs.
- Fold in the dry ingredients:
- Sift the flour and cocoa powder together over the batter, then use a spatula to fold gently until you don't see any dry streaks. A few small lumps are actually fine—they'll dissolve in the oven.
- Set up the water bath:
- Pour the batter into your buttered dish and place it inside a larger roasting pan, then fill the roasting pan with hot tap water until it comes halfway up the sides of the baking dish. This gentle, moist heat is what creates the contrast between the set top and the molten center.
- Bake with purpose:
- Bake for exactly one hour, until the top is set and crackly but the center still jiggles just slightly when you tap the pan. A toothpick inserted into the edge should come out clean, but the very center should be soft.
- Rest and serve:
- Remove from the water bath and let cool for at least 15 minutes so it sets up just enough to serve. Warm bowls with a scoop of vanilla ice cream or dollop of whipped cream alongside transform this into something unforgettable.
 Save
Save I once brought this to a potluck thinking it might be overshadowed by lighter desserts, but by the end of the evening there were only crumbs left and three people asking when I'd make it again. That's when I realized this isn't just a dessert—it's the kind of dish that makes an ordinary dinner feel like an occasion.
The Water Bath Secret
The water bath might seem like an extra step, but it's the whole reason this dessert works. The gentle, humid heat prevents the edges from baking too quickly while the center stays soft and molten. I learned this the hard way the first time I skipped the water bath thinking I could save time—the result was cakey and disappointing. Now I understand that this technique transforms ordinary chocolate batter into something with real sophistication.
Chocolate Quality Matters
You can absolutely taste the difference between using quality semisweet chocolate and the cheaper stuff. Semisweet chocolate has enough cocoa solids to feel rich without the bitterness of dark chocolate, which keeps this dessert in that sweet spot between indulgent and balanced. If you want to experiment, bittersweet chocolate works beautifully too—it just shifts the flavor profile toward darker and more sophisticated.
Serving and Variations
Warm vanilla ice cream melting into the pudding center is absolutely essential, but I've also served this with lightly sweetened whipped cream on lazy mornings when ice cream felt like overkill. The warm-cold contrast is what makes the whole thing come alive on your palate. For a deeper chocolate flavor, add a pinch of espresso powder to the batter or swap in bittersweet chocolate—small tweaks that create entirely different moods.
- This recipe can be halved and baked in a smaller dish if you're cooking for just a few people.
- Make it up to a day ahead and reheat gently in a 300°F oven before serving.
- The flavor actually improves slightly if you let it cool completely and serve at room temperature with whipped cream, though warm is traditional.
 Save
Save This brownie pudding has become my go-to when I want to feel like I've done something impressive but without the stress. It's the kind of dessert that reminds us why we bake in the first place.
Recipe Questions & Answers
- → What gives the top its crackly texture?
The crackly top forms from the sugar and egg mixture beating to a pale ribbon stage, which creates a delicate crust as it bakes.
- → Why bake the batter in a water bath?
Baking in a water bath gently cooks the batter and prevents it from overbaking, ensuring the center stays molten and fudgy.
- → Can I substitute bittersweet chocolate?
Yes, bittersweet chocolate will deepen the chocolate flavor while still maintaining a balanced sweetness.
- → How do I prevent overbaking the dessert?
Remove it when the top is set and crackly but the center still appears soft and pudding-like to preserve gooeyness.
- → What serving suggestions enhance the dish?
Serving warm with vanilla ice cream or lightly sweetened whipped cream adds a creamy contrast to the rich chocolate.