 Save
Save The aroma of buttery cookies mingling with a sweet hint of vanilla always makes my small kitchen feel like a celebration, but the first time I baked a Taurus Zodiac Cookie Box, it was the gleam of gold that caught everyone's eye. I'd been eyeing zodiac-themed bakes for weeks, and one breezy Thursday afternoon, decided impulsively to make something dazzling out of the ordinary. Rolling dough, dusting flour everywhere, and brushing on edible gold felt less like a chore and more like making edible jewelry. There was jazz playing in the background and I found myself humming along, brush in hand, completely absorbed in bringing the Taurus constellation to life on each cookie. These have since become my favorite edible gift, equal parts craft and comfort food.
I made a batch of these for my friend's birthday, knowing she took her Taurus sign as seriously as her tea rituals. We spent a rainy evening painting tiny horns and constellations, sipping chamomile, and swapping stories as the cookies dried—laughing over our slightly crooked stars and who would claim the biggest ones. It's impossible to forget that night, the clatter of paintbrushes on bowls, or the way the box shimmered when she finally opened it. I don’t think a bakery box would have felt half as special.
Ingredients
- All-purpose flour: The base of a crisp but tender cookie: sift for an extra light texture if you have the patience.
- Unsalted butter, softened: Quality butter is worth it here for richness—let it really come to room temp for easy creaming.
- Granulated sugar: Not too much, not too little; this keeps the cookies perfectly sweet and holds the dough together.
- Large egg: Adds structure and just enough lift so the cookies hold their shape beautifully.
- Pure vanilla extract: More than just flavor, vanilla makes the kitchen smell like a bakery every time.
- Almond extract (optional): A drop for depth; skip or swap for citrus zest if almond isn’t your thing.
- Salt: A scant half teaspoon—never skip, it brings the flavors alive.
- Powdered sugar, sifted: Sifting makes royal icing ultra smooth and lump free, even if you’re in a hurry.
- Egg whites or meringue powder & water: Both work; meringue powder is convenient and foolproof if you’re wary of raw eggs.
- Lemon juice: Just a teaspoon brightens the icing and cuts the sweetness.
- Edible gold luster dust: The secret to that luxurious finish—use a light hand and a fine brush for detailing.
- Clear alcohol (vodka or lemon extract): Lets you paint gold easily and dries streak free.
Tired of Takeout? 🥡
Get 10 meals you can make faster than delivery arrives. Seriously.
One email. No spam. Unsubscribe anytime.
Instructions
- Cream the Butter & Sugar:
- Let’s start by beating softened butter and sugar until they look pale and super fluffy—it should sound a little squishy against the bowl.
- Add Egg & Extracts:
- Crack in your egg, splash in vanilla and almond, and mix until the dough smells wonderfully sweet and the mixture looks smooth.
- Combine Dry Ingredients:
- Whisk flour and salt together so every bite will bake up evenly, and add it in gradually, just until a soft dough forms that pulls away from the sides.
- Chill the Dough:
- Split into two discs, wrap snug in plastic, and pop in the fridge for at least 30 minutes while you queue up a playlist or tidy the kitchen mess.
- Roll & Cut Out Cookies:
- Once chilled, roll dough on a floured surface to a quarter inch thickness, cutting Taurus or zodiac shapes as you go and carefully placing them on lined sheets.
- Bake with Care:
- Slide trays into a preheated 350°F oven and bake 10 to 12 minutes, watching for just a hint of gold at the edges—cool completely before frosting.
- Whip Up the Royal Icing:
- Beat egg whites (or meringue powder and water) to soft peaks, sift in powdered sugar, then add lemon juice and vanilla—keep beating until your icing stands tall and glossy on the whisk.
- Color & Fill Icing Bags:
- Divide icing if you want colored accents, then fill piping bags, reserving some white for gold mixing later—tidy up for easier decorating!
- Decorate Creatively:
- Outline and flood the cooled cookies, letting them set at least 2 hours before painting details—patience really pays off here.
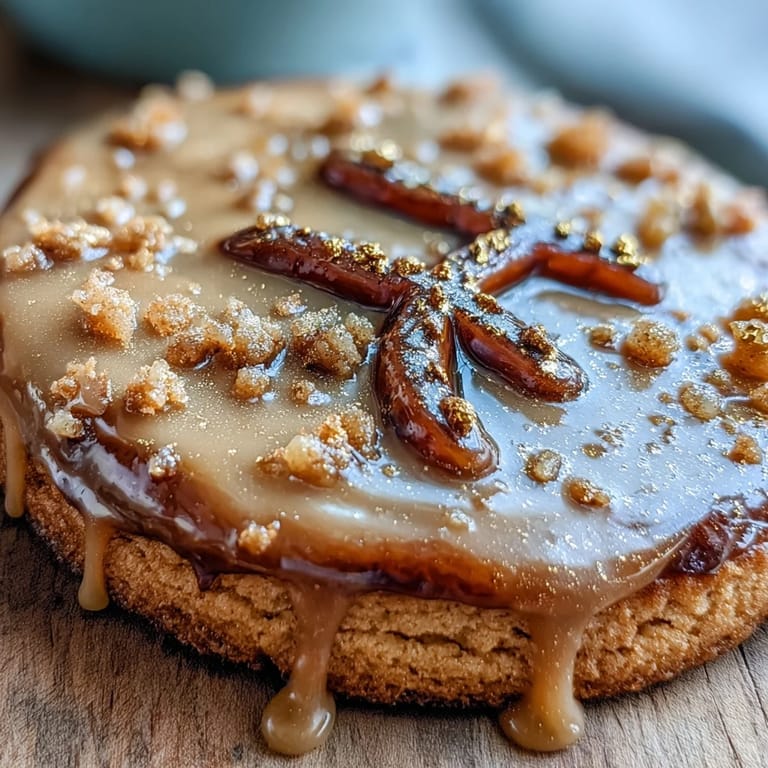
- Paint with Gold:
- Mix luster dust with a few drops of alcohol and use a fine brush for Taurus symbols, constellations, and flourishes; let every gold highlight dry until gently touchable.
- Box and Share:
- Arrange in a parchment-lined gift box, maybe with a little zodiac card or a ribbon to finish if you’re feeling extra fancy.
 Save
Save 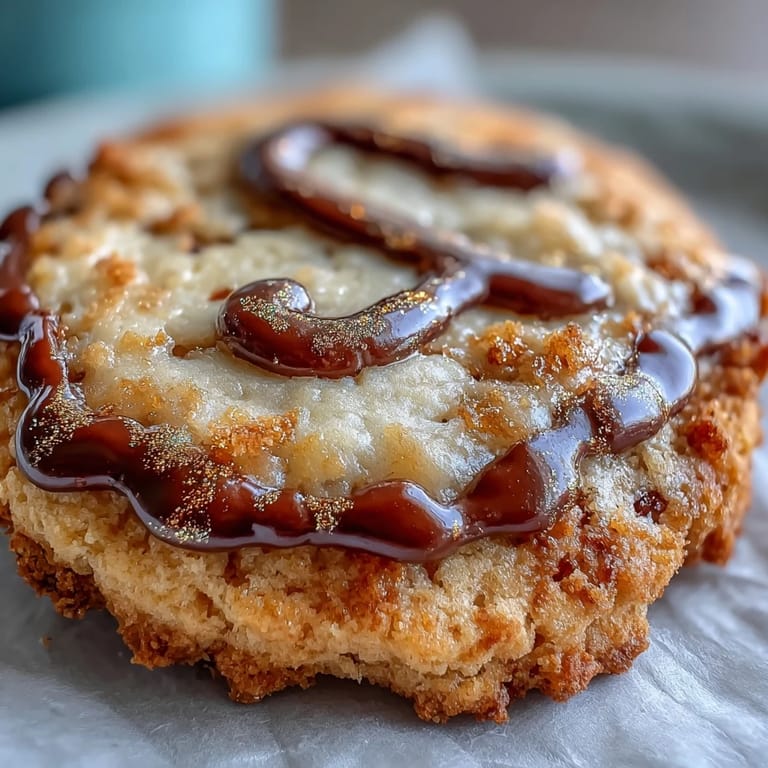 Save
Save The first time someone opened a box of these, their grin sparked brighter than the gold, and suddenly they were sharing their own star sign stories across the table. That turned dessert into a little ceremony, one that still feels just as special each time I bake these.
Mastering the Gold Icing Details
One of my favorite kitchen discoveries was learning to control the luster dust paint: a little goes a long way and swirling the brush on the lid helps avoid clumps. I often test designs on parchment before painting the real cookies, just so I don’t get carried away and overdo the gold. Using a brand-new brush dedicated to food makes lines extra crisp and prevents accidental color mixing that can dull the sparkle.
Keeping Cookies Soft Yet Sturdy
Avoiding overbaking is the secret to keeping these cookies soft in the center; pull them out when the edges barely start to color, not after. Rolling to an eventhickness ensures they all finish at the same time, making big batches less stressful and more fun to decorate with friends.
Packaging and Gifting for Extra Impact
Parchment paper cradles each cookie without sticking and makes your box look polished, even if you’re boxing them at midnight before a birthday. Little zodiac cards or a sprig of dried lavender adds that delightful surprise when the box is first opened. Themed ribbon or tissue brings it all together and makes every cookie feel like a treasure.
- If transporting, wedge bits of crumpled tissue between cookies to keep icing pristine.
- Add a handwritten note to elevate the gift.
- Store cookies in a cool, dry spot to preserve the luster dust’s sparkle.
 Save
Save 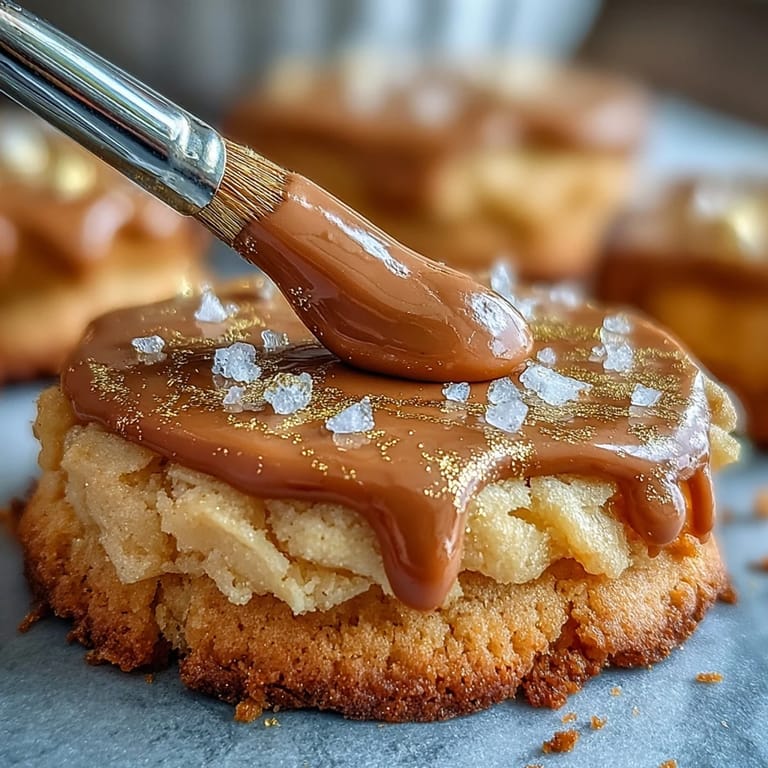 Save
Save Every batch becomes a little celebration, whether for a Taurus birthday or simply for the joy that gold cookies bring. May your kitchen be as sparkly as your cookie box!
Recipe Questions & Answers
- → How do I prevent cookies from spreading?
Keep butter slightly firm, chill the dough at least 30 minutes before rolling, roll to an even 1/4-inch thickness, and chill cut shapes on the sheet for 10 minutes before baking to help maintain edges.
- → What gives royal icing a glossy finish?
Stiff peaks from egg whites or meringue powder and properly sifted powdered sugar create a glossy, smooth icing. Beat until glossy stiffness and avoid over-thinning when flooding.
- → How do I paint delicate gold details?
Allow flood icing to dry fully (several hours). Mix edible gold luster dust with a few drops of clear alcohol like vodka or lemon extract, then use a fine brush to paint symbols, stars, or accents.
- → Can I make a vegan version?
Yes. Use vegan butter and replace the egg with aquafaba for the cookie dough. For icing, aquafaba with sifted powdered sugar can work; test consistency for piping and drying times may vary.
- → How should I store and package the finished box?
Let icing dry completely (ideally 12–24 hours), layer cookies with parchment to prevent sticking, arrange in a sturdy box, and keep in a cool, dry place. Avoid high humidity during storage and shipping.
- → Best way to achieve smooth flood icing?
Mix icing to a syrupy 10–15 second consistency for flooding, outline each cookie first to create a dam, then fill and use a toothpick to level. Allow ample drying time before decorating with gold.